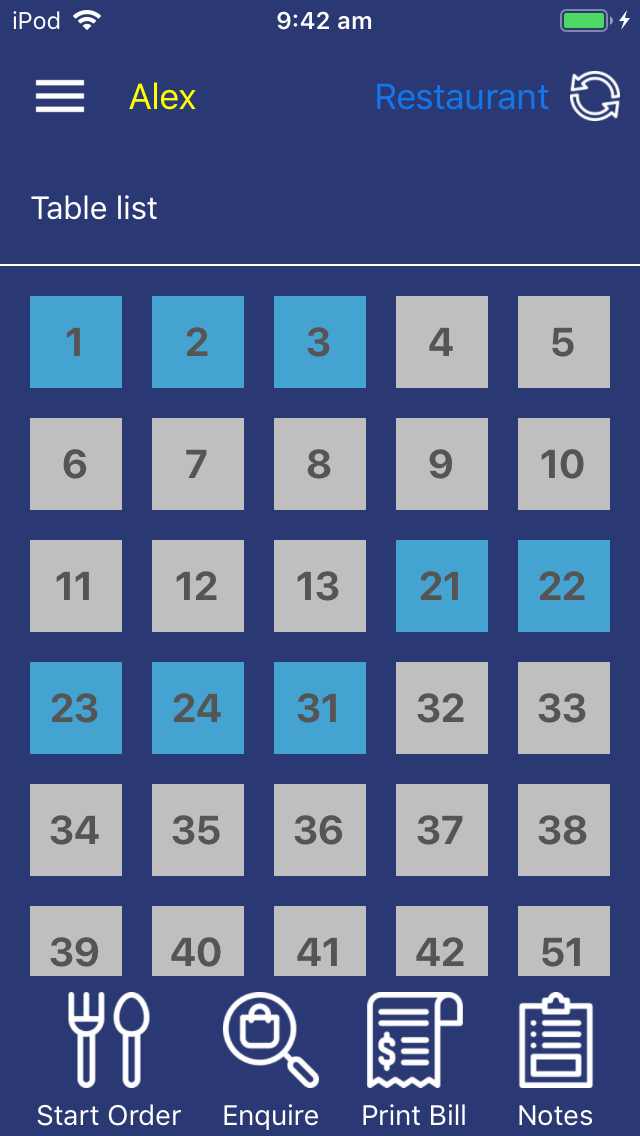
You are here: Mobile Apps > Pocket Pad > Smartphone Device Screens
Enable Connection - When enabled, the app will connect to Idealpos using the Connection details configured below. When disabled, the app will operate offline using the built-in demonstration database and no orders will be sent to the Kitchen. Handheld Licence IP - This field must contain the IP Address of the terminal that has the IH Licence. POS Server IP - This field is the IP Address where the POSServer is located. Server Port - 6983. Terminal ID - This field is used to set the Terminal ID. The Terminal ID is primarily used when taking and processing payments from the Pocket Pad app. When using Pocket Pad to take and process payments, each Pocket Pad device should have a unique Terminal ID configured which will assist when running reports from Idealpos (group by POS terminal will correctly reflect which terminals processed payments). The default Terminal ID is 901. In previous releases of Handheld, the Terminal ID was hard-coded to 901. Download Timeout - This option is used to specify the download timeout used when downloading program data. The default value is 20 seconds. The default value is sufficient for most systems. However, if using Pocket Pad with a lower spec host system and the database contains numerous POS Screen Layouts, a timeout of 20 seconds may lapse before the host system can generate the required data and send back to Pocket Pad. Therefore, the timeout setting can be increased to allow the slower spec system to generate the table data and send it to the app. Stock Notes - Enable this option to use Stock Notes functionality in Pocket Pad. When this option is enabled, Stock Notes for individual Stock Items can be displayed in Pocket Pad by simply holding your finger down (long press) on a Stock Item image or button for approximately 5 seconds, then the Stock Notes for the item will be displayed. This can be used in cases where an item may contain additional details such as the Ingredients used to make an item. It may be useful if a consumer has allergies to specific ingredients and want to determine whether they can consume the item. Show Home Screen - Enable this option to display a Home Screen used by the Clerk to enter their Clerk Code. Use Login Code - This option only applies to the "Show Home Screen" setting. When enabled, Clerks will enter their Login Code instead of the Clerk Code. Connection Settings - Opens the Connection Settings menu from where you can configure the network settings that the Pocket Pad app will use to communicate with Idealpos. Payment Integration - Coming soon. Accumulate Items - Enable if you want items to accumulate when adding more than one of the same item to the order. Compulsory Clerk - Enable to force a Clerk to be entered/selected before sending an order to Idealpos. This will also force a Clerk to be selected/entered after each order is sent to Idealpos. Hide Guest Field - Enable this option to hide the Guests field used to enter the number of Guests that are seated at the table. Note that if "Prompt for Covers" is enabled in the Yes/No options, the Guests field will be hidden regardless of whether this option is enabled or disabled. Hide Seat Selection - This option will hide the seat buttons, thereby disabling the ability to assign items to seat numbers when placing an order from Pocket Pad. Menu in Code Order - By default, the menus will display in alphabetical order. Enabling this option will display the menus in code order. Root Menu Code - If using menus, enter the Menu Code that corresponds to the Main Menu Code that you will be linking to in Idealpos. By default, this is set to 999. If you are using V7 Features, you do not need to have anything in this field as the items will be built from the POS Screen Layout. Lock Table Map - This option will lock the Table Map to the Table Map specified in the Default Table Map setting. Default Table Map - This option is used to enter the Table Map Code that will be used as the Default Map when the Table Map is displayed. Enter the password to gain access to the Settings menu. This password was configured the very first time the Settings menu was accessed. Screen displayed when pressing the TXT button to input a note. Press the "Cancel" button to Cancel entering a note, or enter a Note then press the "Done" button to continue. TXT - This button allows you to add text to the item. Swipe right to left on an item to access. Delete - This allows you to delete the item from the table. Swipe right to left on an item to access. Insert - This will allow you to insert an item that might print out of order. Swipe right to left on an item to access. Back - Returns you to the previous screen (this button only appears on the top-left corner of the screen after navigating between POS screen grids). Table Number - This is the number of the table placing the order. Collapses the menu. Seat Numbers - This will allocate the selected item to a seat number. Total Ordered - This is the current total of all the ordered items. Finalise - This will finalise the sale to the table. After pressing this option, a prompt will display to Send Order, Cancel Order or Do Later. Total Ordered - This is the current total of all the ordered items. Back - Returns you to the previous screen (this button only appears on the top-left corner of the screen after navigating between POS screen grids). Table Number - This is the number of the table placing the order. Pressing the Table Number text will also perform an Enquiry to display any items currently saved to the table. Collapses the menu. Seat Numbers - This will allocate the selected item to a seat number. QTY - This allows you to enter a new quantity for the item. When pressing this button, a prompt will appear for you to enter the quantity. The quantity entered will replace the previously entered quantity for the item. Swipe from left to right to access. Make Entree/Main - This option allows you to assign the selected item to a Print Group Shift. These options will only appear if Print Group Shift 1/2 are configured in Setup > Global Options > Miscellaneous > Ideal Handheld > Print Group Shift 1/2. Make Entree/Main - This option allows you to assign the selected item to a Print Group Shift. These options will only appear if Print Group Shift 1/2 are configured in Setup > Global Options > Miscellaneous > Ideal Handheld > Print Group Shift 1/2. Settings - Selecting this option will display the Settings screen which is used to configure the connection to your Idealpos Back-Office System, POSServer and other settings that affect the behaviour of the Pocket Pad app. Download Program Data - Selecting this option will download the latest Program Data from your Idealpos Back-Office system to the Pocket Pad app. Program Data includes POS Screen Grid Layouts/POS screen Button Colours, POS screen button positions, Notes, Stock Items, Stock Item Prices, etc. Change Password - Selecting this option will allow you to change the Password for the app. The password is used to access the Settings menu as well as Unlock the app (when the app is locked to a table, a Password is required to unlock the app from the table - locking the app to a table is only supported on large devices). About - Selecting this option will display information about the Pocket Pad app. System Logging - Selecting this option will display logs generated within the Pocket Pad app. These are used by advanced users and support when troubleshooting. Log Out - Selecting this option will Log Out the app. This will release the Pocket Pad licence for another device. Clerk - Select the Clerks from the drop down list (if Show Home Screen disabled in app Settings) or Enter Clerk Code/Login Code via Home Screen (if Show Home Screen enabled in app settings). The currently logged on clerk is displayed on the top left corner of the screen. 
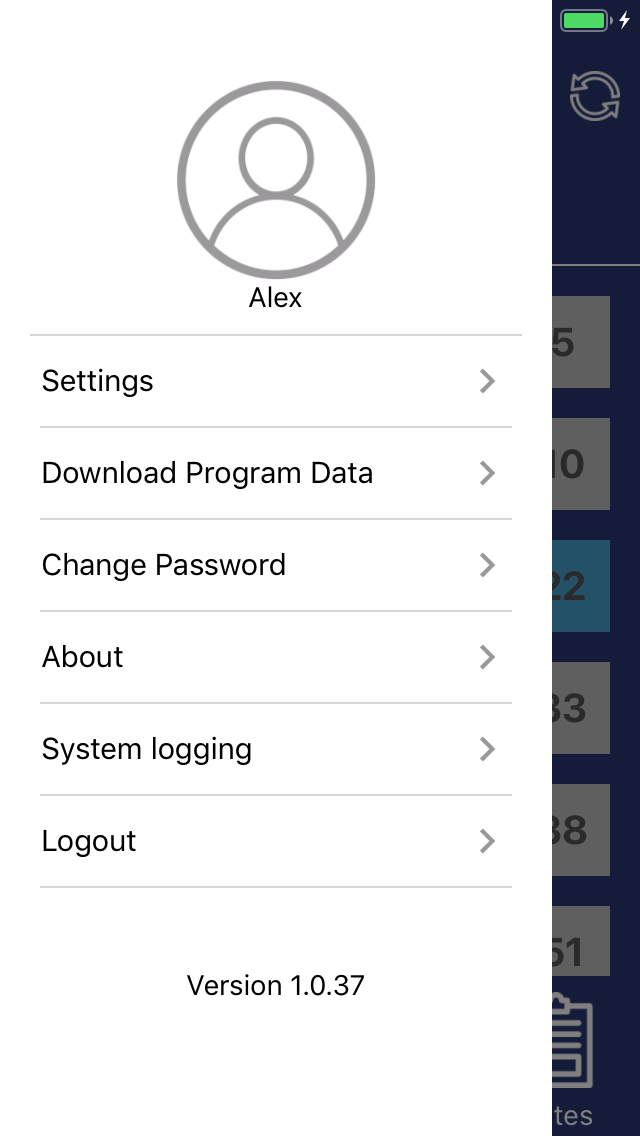
Three Horizontal Lines - Opens the Menu screen to perform additional functions such as Settings, Download Program Data, Change Password, About, System Logging and Log Out. Clerk - Select the Clerks from the drop down menu provided. The currently logged on clerk is displayed on the top left corner of the screen. Table Map - If multiple table maps have been configured in Idealpos, you can select the drop-down to choose the Table Map that you want to use. Refresh - This button will refresh the screen to ensure that the tables are correctly displayed.
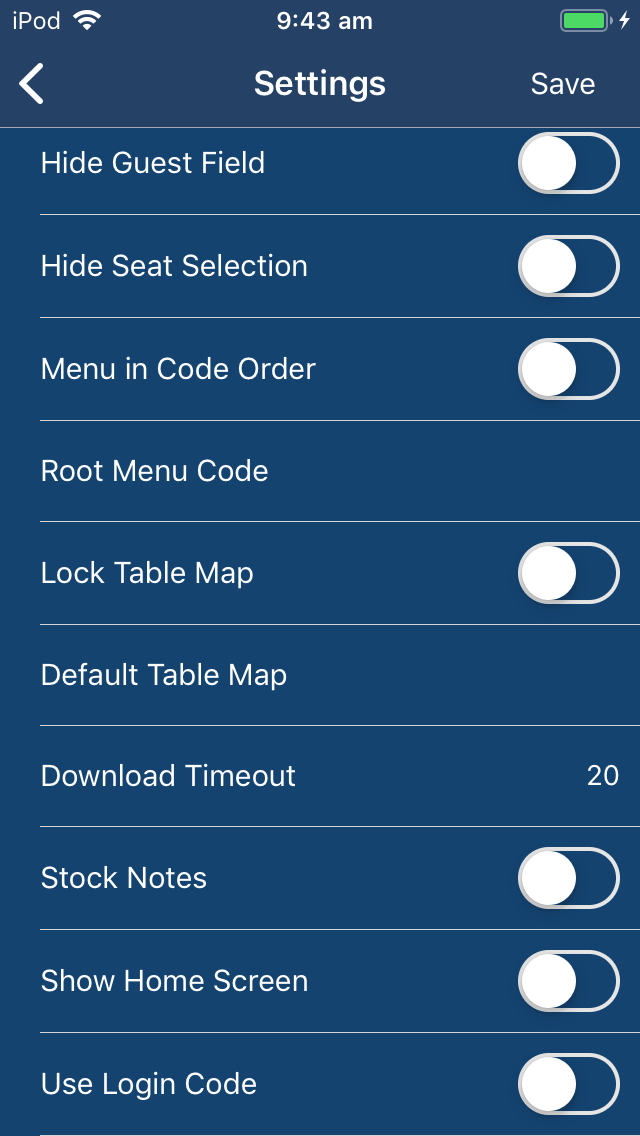
 Table List - Select a table from the Table List. Start Order - This button will allow you to add items to a table. You need to select a table before you can start an order. Enquire - This button will open the table details of all items that have been placed on the table. Print Bill - Select a table number and press this button to print a bill to the default receipt printer. Notes - This button will display any text that has been entered into the Notes field located in Setup > Global Options > Miscellaneous > Ideal Handheld > Notes. Information such as Special Prices/Discounts, Meals of the day, etc. can be entered into the Notes section via Idealpos and they will be displayed in the Notes function on all Pocket Pad devices.

Smartphone Device Screens

There are numerous screens available in Pocket Pad, each which serves a specific function or purpose.

The screens outlined below are displayed on smartphone devices (i.e. Smartphone Devices such as iPhones and others).

If you are using a tablet device (such as an iPad), please refer to the Tablet Device Screens topic.

Select the screen from the below links for more details.